Category Archives: Organic Mama Cafe

Restaurant Style Giant Pancakes or Best Pancakes Ever!

By | Recipes | 6 Comments

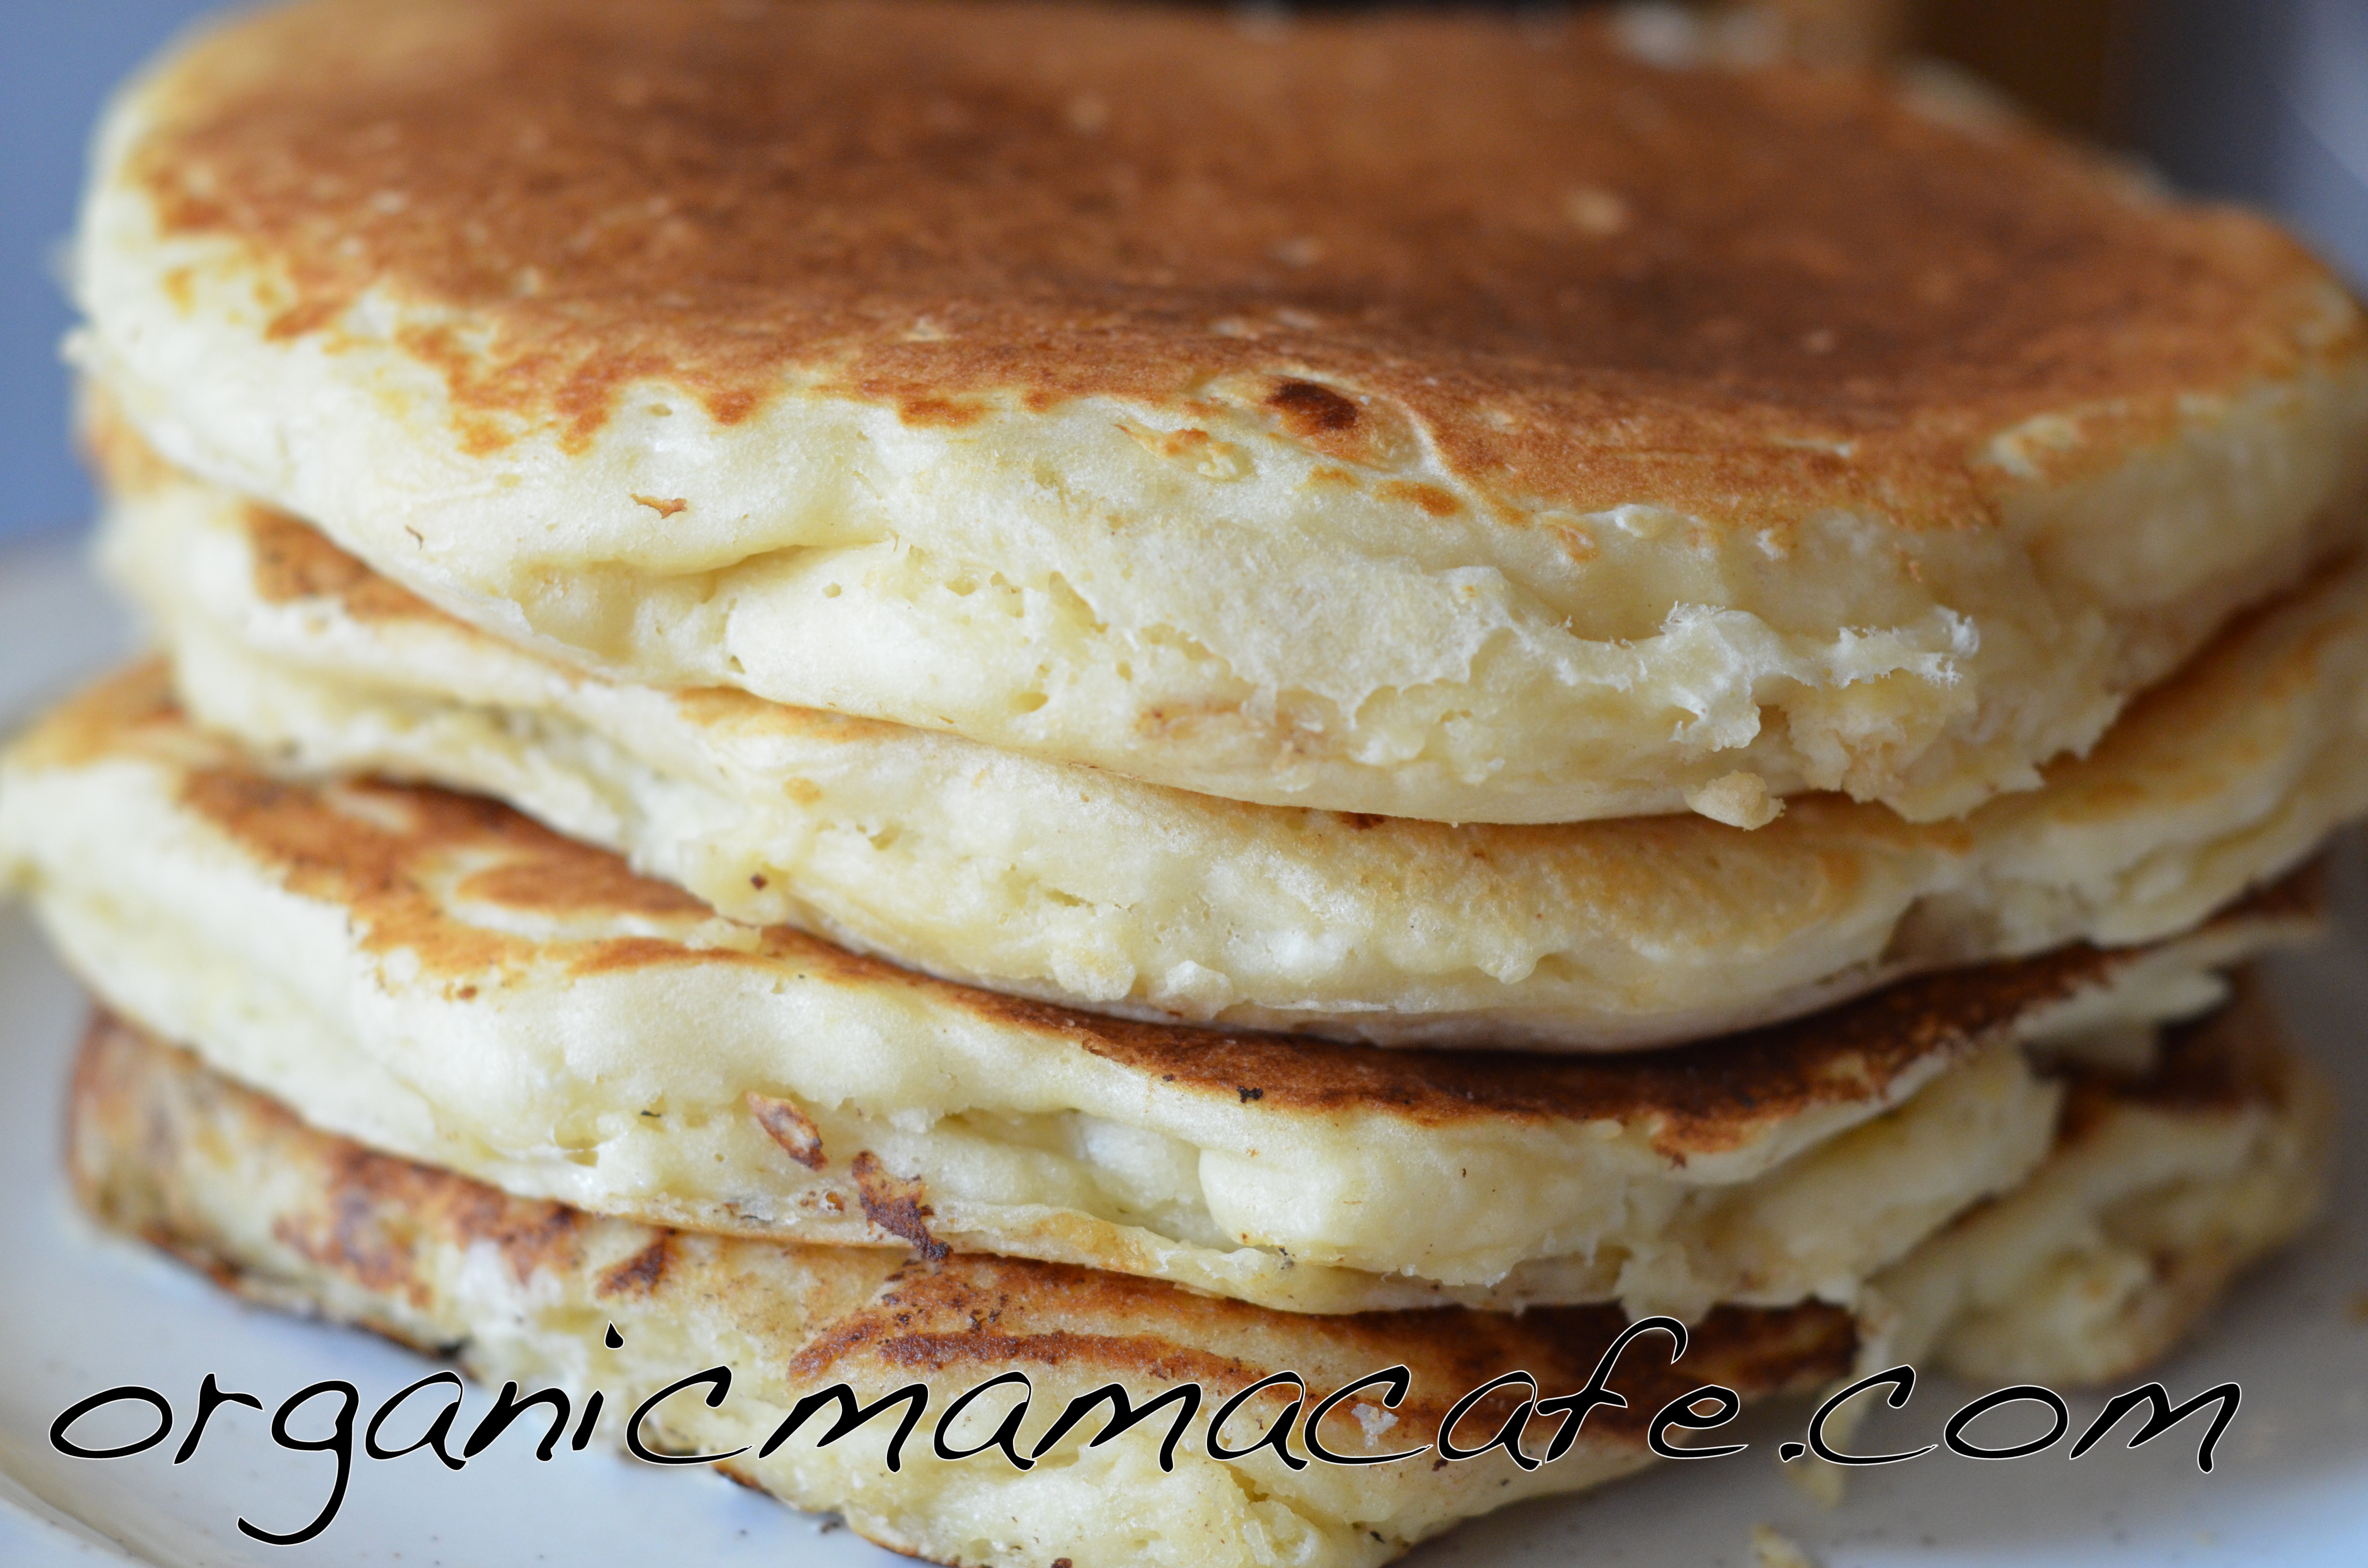
As I promised to deliver, here’s a recipe for the most amazing giant pancakes ever. They’re light and fluffy inside and have the density to hold together when you flip ’em. I’ve been looking for a recipe like this that mirrors the giant pancakes from local restaurant, St. Francis. They serve an awesome brunch on the weekends. But, all my pancake recipes were either too thin or too dense to build a giant cake that baked all the way through before it burned.

Why do I care about giant pancakes so much??

Thanks for asking. Here’s why.

Problem 1: Pancakes take too long. I don’ t have a griddle and I hate standing at a hot stove forever making a bunch of thin little pancakes. Ugh.

Solution: Giant cakes.

Problem 2: I don’t really like them that much. Ironic, since this is the second pancake recipe on the blog. My other recipe is a dairy free, eggless pancake. It’s delicious but problem 1 still applies.

Usually, pancakes are just too heavy for me and I’d rather have something light and cool for breakfast like a smoothie. But lately, DGirl has been too “busy” to finish even her smoothies. So, I’ve been wracking my brains to find food she doesn’t want to “save for later”.

I confess I resorted to food that is traditionally covered in sugar.

Well, syrup. Same thing.

How’s that for an Organic Mama???

After a full day of holding Giant Baby last week (how I spend most of my time since he’s teething), I had to make a relatively fast dinner of the scant ingredients left in our cupboards and fridge at week’s end. We had plans that night with friends and we needed to move quickly.

So, I grabbed a pancake recipe I’d found on pinterest. Rob asked doubtfully, “Are you sure we have time to make pancakes??”

“Of course!” I answered. I then proceeded to completely change the recipe.

hehehe…

Apparently I’m physically incapable of just following a recipe as it’s written. A little imp in my head always whispers, “This would be better with ____”.

In this case, it whispered something about every ingredient.

And, guess what? I not only made my deadline, they were the best pancakes ever!

Man, after that buildup, I hope you’re not disappointed.

This recipe makes 7 giant (HUGE, handspan) pancakes – modeled after the big flapjacks at St. Francis. That probably translates into about 20 normal sized ones. This definitely a family sized recipe but the good news is, you can make them all and refrigerate to heat up later. They still taste good re-heated.

Let me know what you think!
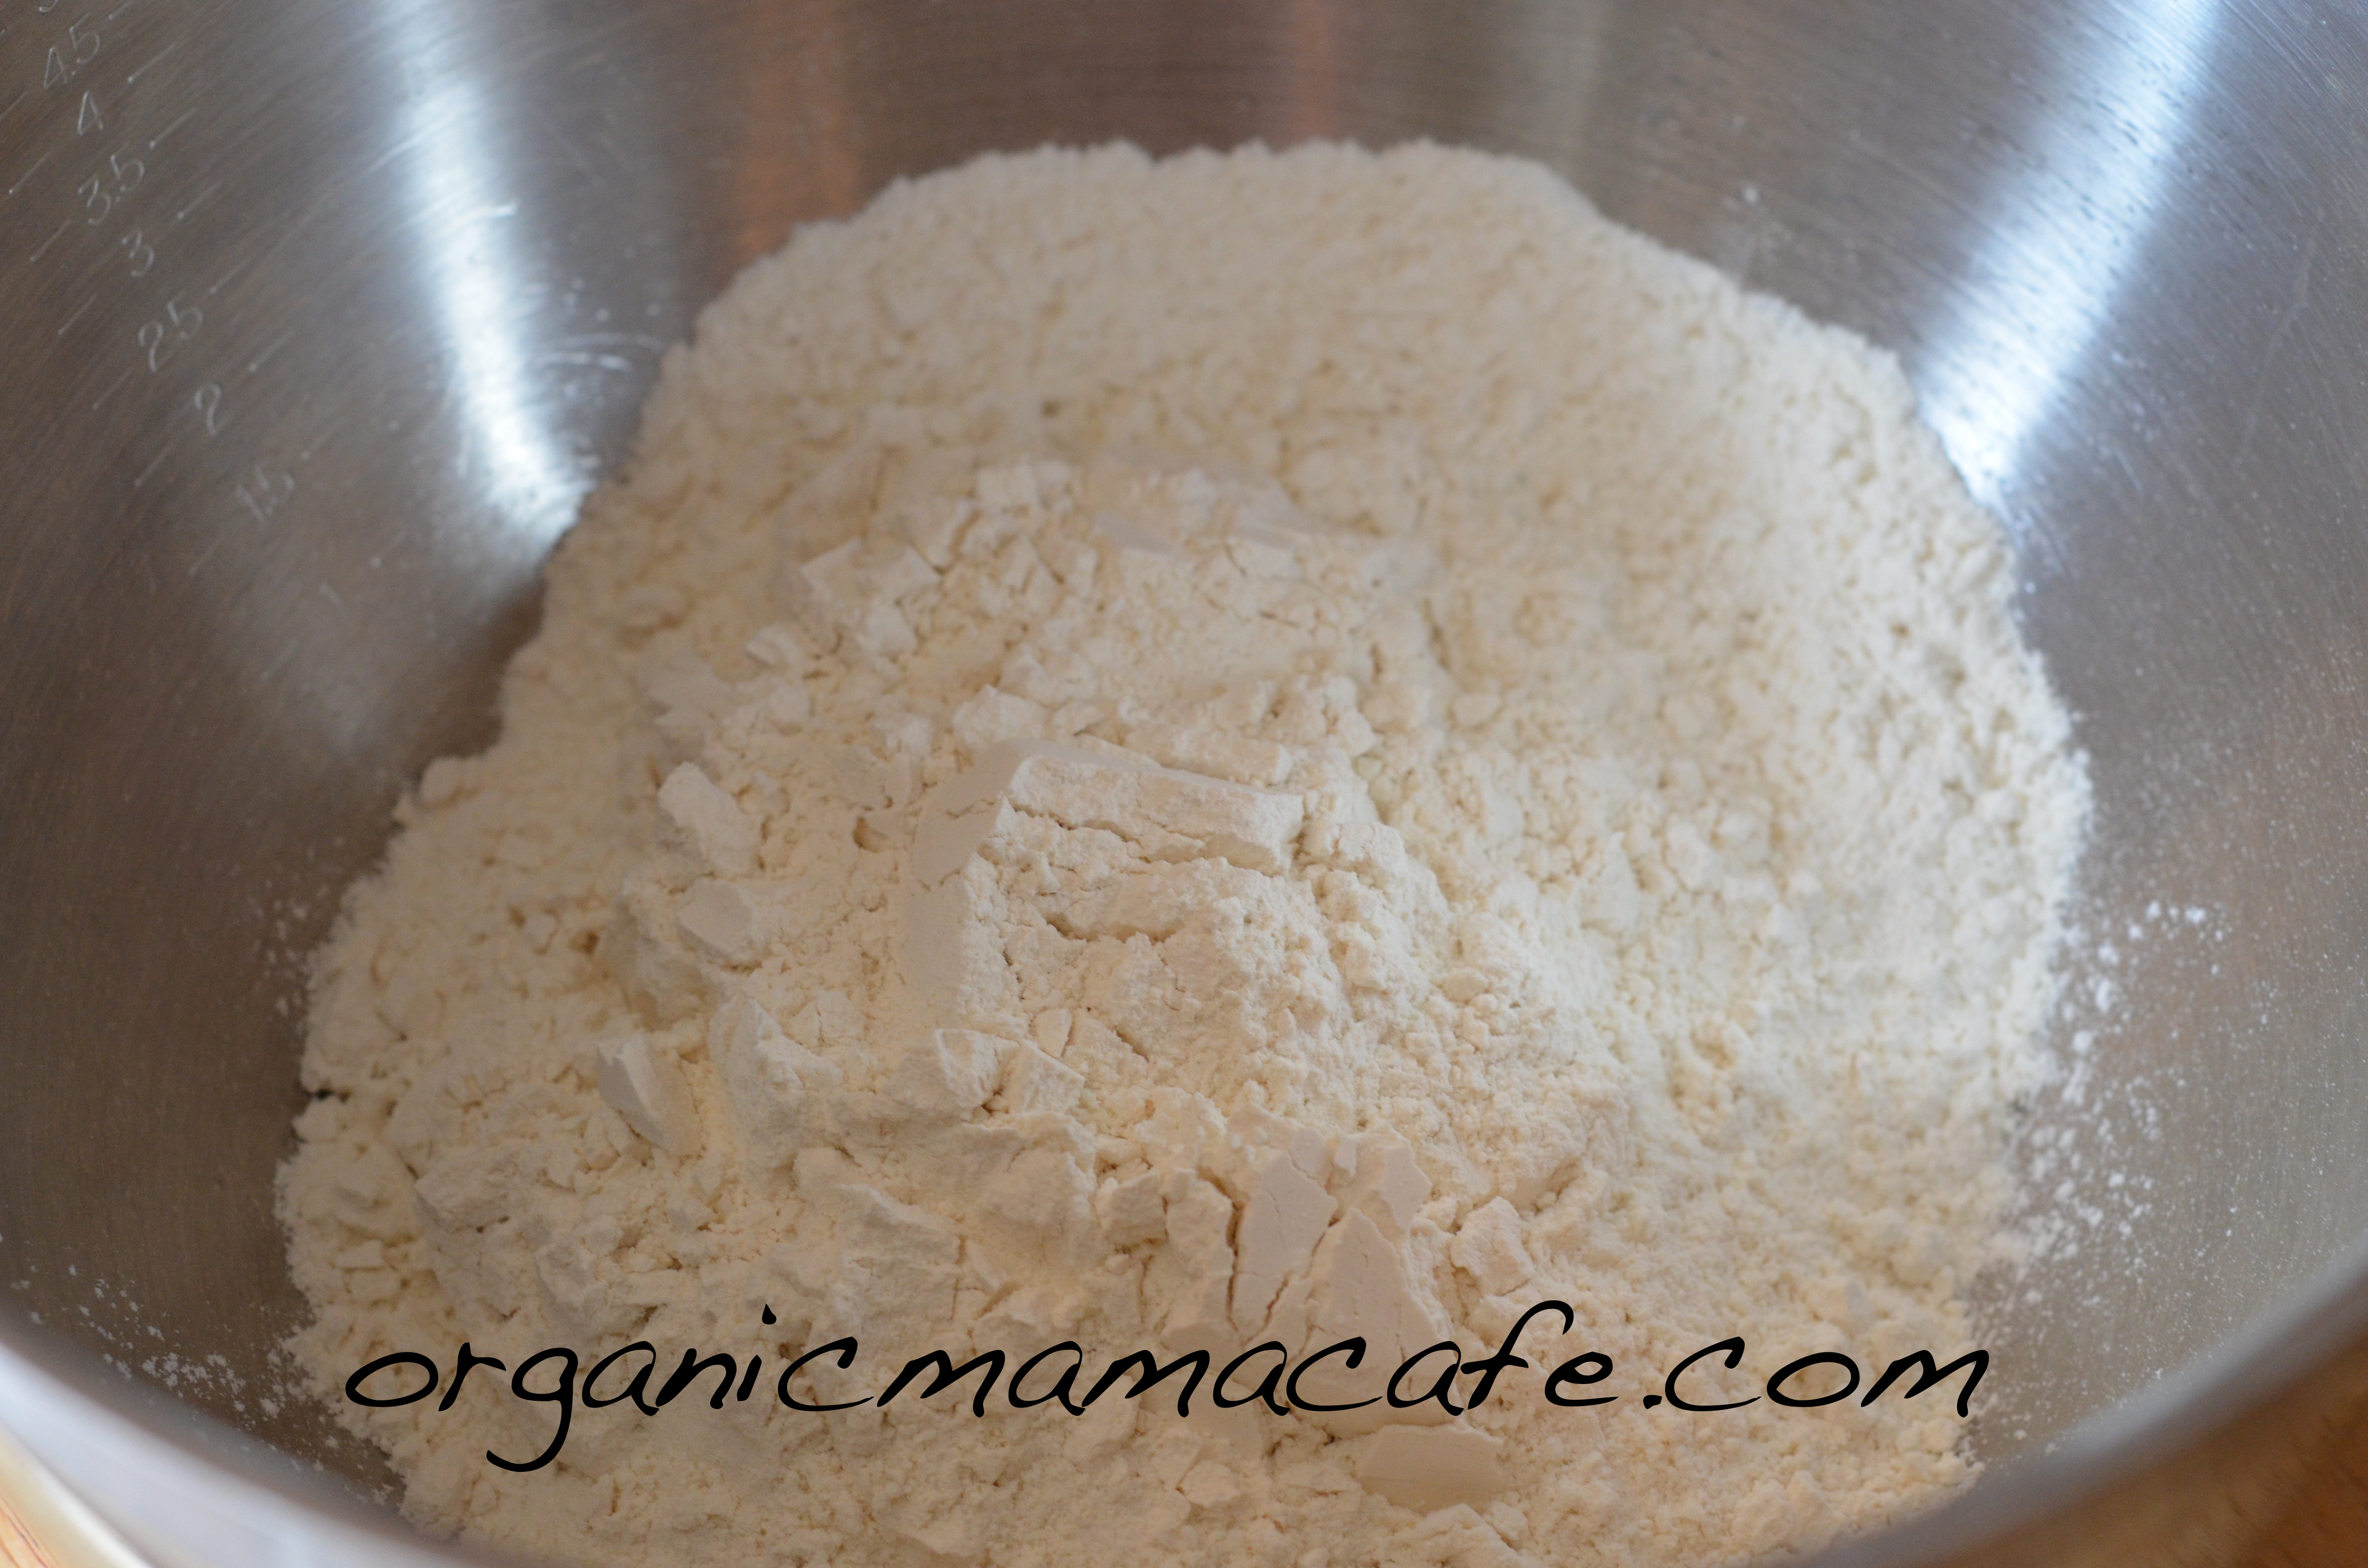

S
tart with 3 c. flour. I didn’t sift it. Just scooped it out of the bag. Hey, I was in a hurry!

Add the baking powder.

And the salt.

Just a bit of sweetness…

Stir it all together. You want to be sure to evenly distribute the baking powder. I just used my measuring spoon.

Part of the levening genius of these cakes!

I think this is actually the secret to the amazing texture of these pancakes. Buttermilk. Yum. Not only are they a levening agent (fluffing power), they add the perfect depth of flavor.

For some reason, vanilla in my pancakes reminds me of Disneyland!

One thing I FORGOT to take a pic of – is the melted butter. That goes in now and it’s delicious. Mine got a tad browned and it just added that much more deliciousness.

Let’s just have a moment of silence for butter. My favorite flavor of all.

<BUTTER.>

Yes, I’m my Grandma’s true child.

Remember to put in the butter!

Moving on.

After you add the water, gently stir the batter just enough to mix the ingredients. It’s ok if it’s a tad lumpy. It will be super thick like frosting.

When you spoon it into the pan, spread the batter around a little. It shouldn’t be much more than 1/4″ high or it won’t cook all the way through before the outside burns.

This was the pan I melted the butter in so no judgement okay? No sense wasting good butter!

See how the bubbles are starting to pop through the surface of the pancake? You should see these all over the top before you flip it!

The bottom should be golden brown before flipping!

Aaaaannnnnndddddd…… FLIP!  See how perfect mine looks? Yeah, that’s how I roll.

Just kidding. It actually “squooshed” a bit but I just smooshed the batter back under the pancake.

What my family doesn’t know won’t hurt ’em.

And – TAAAADAAAAAAAAA!  This is what we had for dinner.

Only nobody really ate 4. I couldn’t eat a whole cake, it was so big. That’s ok. More for later.

Awesome, right? I’m not kidding. These ROCK.

High words of praise in this house.

Perfect Giant Pancakes
Recipe Type: Breakfast, or dinner, or 2nd breakfast, elevensies…
Author: Monna
Prep time: 10 mins
Cook time: 20 mins
Total time: 30 mins
Serves: 6
Fluffy, giant, flavorful pancakes!
Ingredients
  • All ingredients are organic.
  • 3 c. flour
  • 2 T. + 2t. baking powder
  • 1 1/2 t. fine sea salt
  • 2 T. brown sugar
  • 3 eggs
  • 2 1/2 c. buttermilk
  • 1 T. vanilla
  • 1/2 c. salted butter (if using unsalted, add 1/4 t. more salt)
  • 1/3 c. water
Instructions
  1. Place butter in a pan on med-low to melt.
  2. Measure dry ingredients into a large bowl and stir together thoroughly.
  3. Add 3 eggs, buttermilk, vanilla, butter and water to dry ingredients and stir gently till all ingredients are incorporated. Lumps are ok. Mixture will be thick.
  4. Using a ladle, scoop batter onto a hot, buttered pan and spread to no more than 1/4″ thickness. I cooked mine just under medium heat.
  5. When the surface of the pancake puffs up and is covered with tiny bubbles, flip it! If the cooked side looks burnt when you flip it, turn the heat down.
  6. Cook till underside of pancake is golden brown.
  7. Serve ’em hot and with syrup!
  8. *Organic Mama cooking tip: If the pancakes don’t cook all the way through before the outsides are burnt, turn your pan down a little!
Notes

If you have extra, refrigerate or freeze. When you’re ready to use them, place in a toaster or toaster oven and reheat.

If you think these look as good as I do, share with your friends. Check out the new Pinterest button!

Flourless Lactation Cookies: Monster Cookie Style

By | Breastfeeding, Recipes | 116 Comments

Do giant chocolate chip oatmeal cookies studded with almond slivers sound like  the perfect snack today? You’re in luck.

If it seems like a lot of my posts are recipes lately, it’s probably because they are. I’m settling into life since adding Giant Baby to our family and I’m working hard to keep up with his milk needs.

Unfortunately, like my other two kids, he’s had pretty significant latch issues, including a high narrow palate and a severe upper frenulum tie. So, I’m pumping again this time to keep my supply up. Still, I’m pretty happy about the fact that he nurses at all since I didn’t get to nurse my other two babies.

Whether you’re nursing “Giant Baby” like I am (he’s 19 pounds and just turned 3 months today!) or nursing a normal sized kid, there are days when you might need a little boost in supply. As a mom who’s struggled to keep up my supply with latch-challenged kids, I have a laundry list of lactogenic foods, drinks and herbal galactagogues that can help.

Here’s one of the more fun ones!

I’d run across several lactation cookie recipes, including one that contained kale and carrots. The ingredients that are standard in all of them are nut butter (protein), oats (milk booster!) flax seed and brewer’s yeast. I added slivered almonds because these also contain lactogenic properties. Plus, they’re delicious and healthy.

Just a note about brewer’s yeast. I’ve heard it lauded from time to time as a milk-booster but in three babies, I’ve never tried it till now. Boy, I wish I’d found it sooner! It definitely boosted my supply. I don’t know if it’s the B-complex vitamins or what but it works.

Some people suggest drinking Brewer’s Yeast in water but I found that caused some stomach issues for me. Eating it in a baked good with flax seed meal seems to be even more effective and there are no unpleasant side effects.

The great thing about this recipe is that it contains no flour and includes more oatmeal than most recipes. It’s modeled after the Monster Cookie recipe my mom used to make for us as kids, though it only has 3 1/2 c. of oats instead of the 6 that her recipe used. I only had dark chocolate chips on hand but if you have butterscotch chips or some other favorite candy, you can use it too.

Even if you’re not nursing a new little one, these cookies are absolutely delicious.

Chocolate studded, oatmeal lactation cookies


Flourless Lactation Cookies

Wet ingredients

  • 1/2 c. butter (softened)
  • **16 oz REAL peanut butter – as in smooshed peanuts, not Jiffy or Skippy or any of that high fructose corn syrup enhanced stuff. (that’s how big my jar was but 14 oz would be ok too)
  • 1 1/2 c. brown sugar
  • 3 eggs
  • 1 T. real Maple syrup (optional)
  • 2 t. vanilla

Dry ingredients

  • 1/2 t. salt maybe 1/4 if you’re using really salty butter
  • 3 T. Brewer’s yeast
  • 1 c. flax seed meal (Grind the flax seeds in a coffee grinder for freshest taste.)
  • 3 1/2 c. oats
  • 2 t. baking soda
  • 1 c. dark chocolate chips (or toffee, butterscotch etc.)
  • 1 c. almond slivers

Preheat oven to 350º F

1. Stir together butter, peanut butter and brown sugar till thoroughly mixed.

2. Add eggs and beat till mixed.

3. Stir in vanilla and maple syrup.

4. Add dry ingredients and mix thoroughly. Nothing like biting into a pocket of baking soda. Yuck!

5. Use an ice cream scoop to shape cookies. Press flat on cookie sheet before baking. They are kind of sticky and a little hard to shape but press on. It is worth it.

6. Bake 17 minutes. The cookies should be chewy and soft, not crunchy. Your oven might be a little more or less so keep an eye on them.

7. Pour yourself a glass of milk and nosh.

Yum.

**You can substitute almond butter for the peanut butter.

Like this? Try my Zucchini Coconut Bread.

As with all my posts…If you like it, spread the sweetness! Tweet, Facebook or email to anyone who might benefit from it. 🙂

Remember to take care of yourself mama!


Watermelon Slushies!

By | Recipes | 2 Comments

Today has been a hot day.

Too hot to think and too hot to write.

Apparently, not too hot for giant baby to talk though. He’s found his voice and he’s been giving me his opinion all day. Thankfully, he’s happy!

So, we need something cool. This is easy, delicious, cold, sweet and healthy! Also a great remedy for kids who tend toward constipation but don’t like to eat fruit. I know, you didn’t see that one coming, right? I guess I have to add something thoughtful. Ha!

Watermelon = fiber + water.

So much tastier than metamucil, right?

Watermelon Slushies

1. Cut fresh watermelon into smallish chunks – about 2″ pieces.

2. Place in freezer till frozen (you can use a bag or a cookie sheet).

3. Take watermelon chunks  out of freezer and place in a blender jar. How much you need depends on how many people you are serving or how thirsty you are!

4. Let the watermelon sit in the blender jar until you have enough watermelon juice to make the blades move. I nearly filled my blender jar with melon and about 6-8 ounces of juice got things moving.

5. Blend till melon is slushy.

6. Pour into glasses and serve.

Ours is garnished with basil since that’s Destructo Girl’s favorite flavor. I would have put a few leaves in the blender but I forgot.

See? Too hot to think!

If you’re serving adults, I bet you could just use a little “spirit” to get that blender moving too.

What is your favorite healthy hot weather treat?

Shared at Frugally Sustainable.


Zucchini Coconut Oil Bread: Or How to Re-focus Destructo Girl

By | Honest Mothering, Recipes | 4 Comments

Baking isn’t something I do much of in the summer. In fact, as I mentioned to my friend Dani today, all I want to do lately is drink my meals. Before you start judging (or laughing)… While I’m tempted to imbibe large amounts of consciousness altering beverages during these sleep deprived, crazy preschooler-centric days, I’m actually drinking smoothies. Mainly veggie heavy smoothies. Yesterday, two of my three meals were smoothies. It was heavenly.

Of course, after that many smoothies, we all wanted a little something to “stick” to our ribs. Plus, we needed a distraction from the stir craziness that heat advisory house arrest creates for a mom with a younger kids.

Yesterday and today, exhaustion, the frustration of monotonous tasks and the feeling that I never get anything done anymore finally got to me and I felt myself rapidly approaching insanity. First, I gave in to my inner bi-atch and, I’m ashamed to say, was a total grump with my poor kids. Then, I freaked out and cried hysterically for a few minutes. I’m not joking. There. I said it in public!

Annoyed with myself for my lack of control, I took a deep breath and decided to change direction. When my sweet giant baby finally took a nap, I got out the mixing bowls and ingredients to make a sweet treat that would use up the zucchini overload in my fridge.

As I prepared the tools for baking, Destructo Girl came in and said, “Mommy, I would like to watch you cook.” I said, “You bet!”

We had so much fun! Doing something unusual like baking together in the middle of a hot, hot day really changed the whole attitude of our house.

I didn’t intend to create a recipe out of this. I wanted to learn a lesson about self discipline – the art of taking a breath and choosing a different path. The awesome recipe was just a happy accident.

First, I should warn you that because I didn’t intend to post this, my baking time is an estimate. I’ll update the post the next time I bake this. Second, while this recipe uses nutrient dense ingredients that are good for all of us like Coconut oil, whole wheat pastry flour, zucchini, eggs and milk, I consider it cake though most would consider it a quick bread. Nursing mamas will love that it also includes ingredients that encourage more milk – brewer’s yeast and flaxseed meal. The final result is a moist, flavorful and satisfying treat!

p.s. Please, please, PLEASE don’t ruin this recipe by trying to substitute nasty canola oil for the coconut. Ugh. If you need to sub, try melted butter or avocado oil.


*If you don’t want to heat up your house, do what I do and bake this in a convection/toast oven on the back porch. YES!

Zucchini Coconut Oil Cake

Streusel topping

  • 1/2 whole wheat pastry flour
  • 3/4 c. brown sugar
  • 1/2 t. nutmeg
  • 2 t. ground cinnamon
  • 1/4 c butter

Cake dry ingredients

  • 2 1/2 c. whole wheat pastry flour
  • 1/2 c. flax meal (I just whiz some flaxseeds in my coffee grinder)
  • 3 T. Brewer’s yeast
  • 3/4 t. nutmeg
  • 1 t. fine sea salt
  • 1 t. baking soda
  • 1 t. baking powder

Wet ingredients

  • 1 c. coconut oil
  • 2 c. brown sugar
  • 3 eggs
  • 2 t. vanilla extract
  • 2 cups grated zucchini (not drained)
  • 1/2 c. milk

1. Preheat oven to 325 F.

2. Grease and flour two loaf pans. (I used 1- 8.5×4.5×2.5″ and 1-5.25x9x2.75″ because I don’t have matching ones! This, along with my being distracted by three kids, is partly why my baking time is fudged.)

3. In a medium bowl, measure the dry streusel ingredients and mix in the butter with a fork or fingers till it resembles small crumbs. Destructo Girl used her fingers on this step and was integral to its deliciousness.

4. In a separate bowl, combine the dry ingredients and stir together thoroughly. 

5. Finally, in a larger bowl, mix the coconut oil and sugar together till well combined. (I used a hand mixer.)

6. Add the eggs one at a time till just mixed.

7. Add vanilla, zucchini and milk.

8. Finally, dump the dry ingredients into the wet and stir until just combined.

9. Divide batter between the two loaf pans, being sure not to fill more than 1/2 to the top.  (Believe me, I did this over the weekend for my oldest’s b-day cake and it was an epic mess!) This batter is pretty wet looking.

10. TOP with streusel.

11. Pop in the oven and bake somewhere between 45 min and an hour. Ok, I realize this part might freak some of you out – so here’s how to tell if it’s baked all the way. Bake it at least 1/2 hour before opening the oven because you don’t want your cake to drop. I waited about 45 before checking.

You can tell a cake is done using two tests. First, if you press gently into the middle, the dough will spring back instead of staying indented. Second, if it springs back and a toothpick inserted deep into the middle comes out clean (or with just crumbs on it – not wet!), you’re golden. If your cake is already pulling away from the sides of the pan, chances are it’s overdone.

Hope you enjoy this! Let me know if you bake it.

If you liked this post, share it!

Don’t miss out on the conversation. SUBSCRIBE to OM Cafe. It’s free. 

YTo3OntzOjk6IndpZGdldF9pZCI7czoyMDoid3lzaWphLW5sLTEzNTAyMjcwMTAiO3M6NToibGlzdHMiO2E6MTp7aTowO3M6MToiMSI7fXM6MTA6Imxpc3RzX25hbWUiO2E6MTp7aToxO3M6MTM6Ik15IGZpcnN0IGxpc3QiO31zOjEyOiJhdXRvcmVnaXN0ZXIiO3M6MTc6Im5vdF9hdXRvX3JlZ2lzdGVyIjtzOjEyOiJsYWJlbHN3aXRoaW4iO3M6MTM6ImxhYmVsc193aXRoaW4iO3M6Njoic3VibWl0IjtzOjEwOiJTdWJzY3JpYmUhIjtzOjc6InN1Y2Nlc3MiO3M6NTA6IkNoZWNrIHlvdXIgaW5ib3ggbm93IHRvIGNvbmZpcm0geW91ciBzdWJzY3JpcHRpb24uIjt9